Turn WiFi ON/OFF in Windows 10
WiFi can be defined as a Wireless Local Area Network (WLAN) that makes uses of high-frequency radio waves to provide wireless Network and Internet connection to devices. Most devices, including Windows 10 Computers make it really easy to Turn WiFi ON/OFF and connect to your preferred WiFi Network. However, it is not uncommon to come across situations where you may find yourself struggling to Turn WiFi ON/OFF in Windows 10, especially when your computer is experiencing WiFi Connectivity Problems. Hence, this article providing you with various methods to Turn WiFi ON/OFF in Windows 10.
1. Turn WiFi ON/OFF Using Keyboard
The simplest way to turn WiFi ON/OFF in Windows 10 is to use the WiFi key on the keyboard of your computer. Many computers have a dedicated WiFi key on the keyboard. Simply press the WiFi Key on the keyboard of your computer and this button works like a toggle switch, switching WiFi ON when pressed and Switching OFF WiFi when pressed again.
2. Turn WiFi ON/OFF From The Taskbar
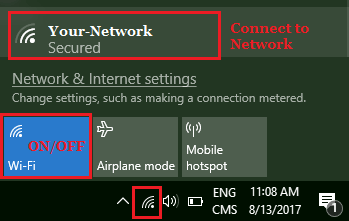
Click on WiFi icon located at bottom-right corner > click on WiFi Action button and select your WiFi Network Name to join your WiFi Network.
The WiFi Action button works like a toggle, allowing you to Turn WiFi ON/OFF by just clicking on it (See image above).
3. Turn WiFi ON/OFF Using Notifications Icon
You can also Turn WiFi ON/OFF by clicking on the Notifications Icon. Click on the Notification icon located at bottom right-corner of the screen and then click on Network.
Next, click on WiFi Action button > select your WiFi Network to Turn ON WiFi on your computer.
4. Turn WiFi ON/OFF Using Settings
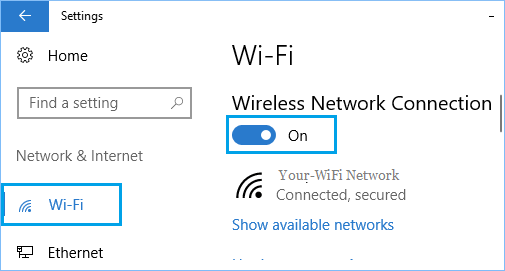
Click on the Start button > Settings icon > Network & Internet > On the next screen, select WiFi in the left-pane and move the toggle under Wireless Network Connection to ON position.
5. Turn WiFi ON/OFF When There is No WiFi Icon in Windows 10
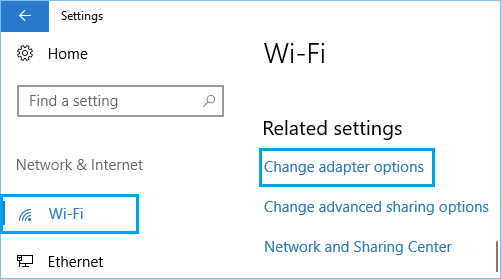
In case you do not find a WiFi icon, it is likely that you have an Ethernet cable plugged into your computer or the WiFi Adapter has been switched off on your computer. Click on Start button > Settings icon > Networks & Internet > Click on WiFi in the left-pane and click on Change adapter options in the right pane.
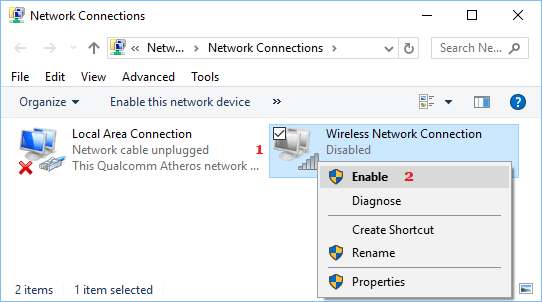
On the next screen, right-click on Wireless Network Connection and select Enable option in the menu that appears.
WiFi Connectivity Problems in Windows 10
Hopefully, you should be able to connect to internet after switching ON WiFi on your computer. If you are still having problems and unable to connect to WiFi, you can take a look at the following articles.
Fix: WiFi Keeps Disconnecting in Windows 10 Windows 10 Not Connecting to WiFi Automatically
![]()

