Touchscreen Not Working in Windows 10
If the Touchscreen has suddenly stopped working on your computer, take a good look at the screen of your computer and make sure that it has not suffered any kind of physical abuse or damage. Next, try using the Keyboard, Mouse or Trackpad, to make sure that your computer is working. If the Keyboard or Mouse is not responding, it is possible that your computer is stuck. The next step is to Shut down the computer by pressing the Power button, wait for about 60 seconds and Restart the computer. When the computer restarts, you may find the Touchscreen back to its normal working condition. However, of the Touchscreen is still not working, use the mouse and keyboard to follow methods as provided below to fix the problem of Touchscreen not working in Windows 10.
1. Disable/Enable Human Interface Devices
Disabling and Enabling the Touch Screen Driver is known to fix the problem.
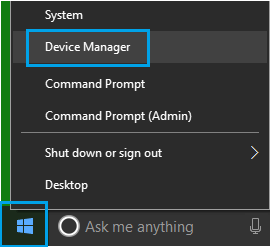
Right-click on the Start button and click on Device Manager.
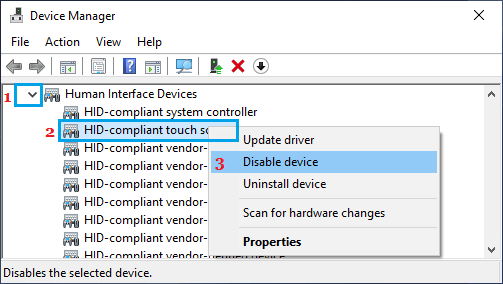
On the Device Manager screen, expand Human Interface Devices entry > right-click on HID-compliant touchscreen and click on Disable Device. Note: If you find multiple HID-compliant touchscreen entries, repeat the above step and disable all of them.
Restart your computer.
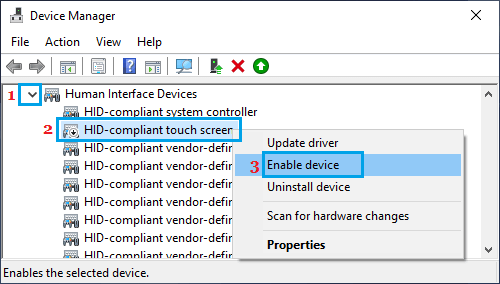
After the computer restarts, go to Device Manager > expand Human Interface Devices > Right-click on HID-Compliant touchscreen and click on Enable Device option.
Note: Repeat the above step for all HID-compliant touchscreen entries (if any). 5. Restart your computer for the changes to be implemented. After the computer restarts, check to see if the Touchscreen is now working.
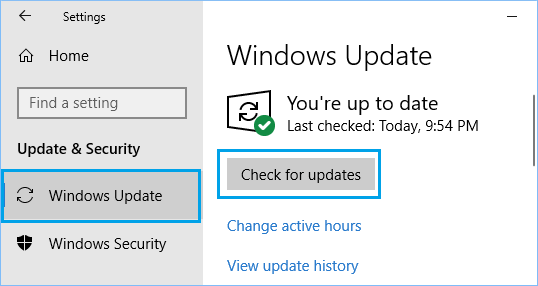
2. Check For Updates
If the above method did not help, it is possible that your computer does not have the latest software updates.
Go to Settings > Update and Security > click on Windows Update in the left pane. In the right-pane, click on Check for updates button.
Download and Install Updates (if they are available).
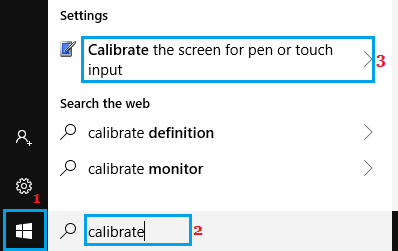
3. Configure Touchscreen
Follow the steps below to configure the screen on your Windows Laptop as a Touchscreen.
Open Calibrate the screen for pen and touch input option on your computer.
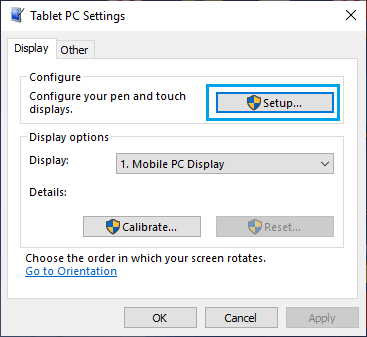
On the pop-up that appears, click on the Display tab and click on Setup.
On the next pop-up, click on Touch Input option.
Follow the on-screen prompts to identify the screen on your computer as a Touchscreen After completing these steps, check to see if the Touchscreen is now working on your computer.
4. Adjust Power Management Settings for Touchscreen
The problem of Touchscreen not working on your computer might be related to the power saving settings on your computer.
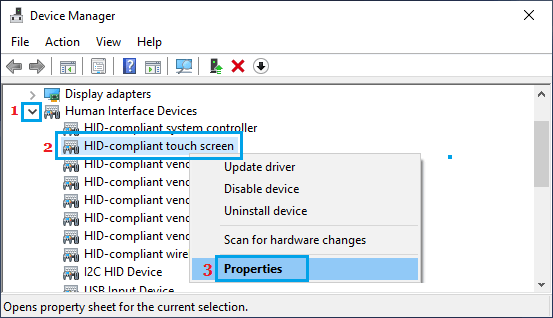
Open Device Manager on your computer.
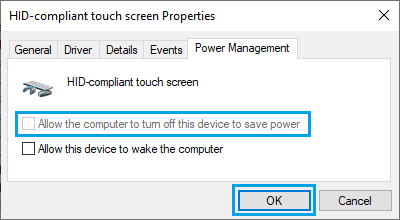
On Device Manager screen, expand Human Interface Devices entry > Right-click on HID-Compliant touchscreen and click on Properties.
On the next screen, click on the Power Management tab and uncheck Allow the computer to turn off this device to save power option.
Click on OK to save this setting on your computer. Restart your computer and see if the Touchscreen is now working.
6. Reset Your Computer
If above methods did not help, you can follow the steps provided in this guide to Reset Windows 10: How to Factory Reset Windows 10 Computer.
7. Perform System Restore
If you had created a System Restore point on your computer, you can try to Restore your computer using system restore.
How to Disable Lock Screen in Windows 10 How to Boot Windows 10 From USB Drive