If you’re hearing a stuttering/buzzing sound coming out of your Realtek devices then don’t worry, you’re not alone. A lot of Windows 10 users reported that they encountered Realtek audio skipping issue on Windows 10 when playing or streaming music, games, online videos, movies, etc. To help you fix Realtek audio stuttering, we investigated this particular problem too by looking at a number of user reports and shared a list of various workarounds that helped other affected users in this article below.
Quick & Easy Ways to Fix Realtek Audio Stuttering Issue on Windows 10
Try the following solutions to fix PC audio stuttering issue caused by the Realtek sound devices. The outdated and faulty audio drivers are the major cause for the Realtek sound stuttering or distortion issue. Therefore, to resolve it, we recommend you update or download Realtek high definition audio driver with the help of a dedicated driver updating tool, such as Bit Driver Updater. The software automatically analyzes hardware components and allows users to update all outdated, missing, and defective drivers at once with just a single mouse click.
Solution 1: Some Simple Hacks to Try First
Before moving to the advanced solutions, let’s first go through the following simple hacks to check if they help solve your problem or not.
- Restart Your Computer If this is the first time you’re experiencing a stuttering or crackling sound problem, then you could try rebooting your PC for resolving it.
- Check Your Cables and Volume Ensure that all the headphone cables and speaker cords are plugged into the correct jacks. Also, check your volume levels and make sure the mute setting is not enabled.
- Try a System Restore If you are troubled by Realtek audio stuttering on Windows 10 after you installed the recent updates, then you could try rolling back to an earlier system restore point. If all of the aforementioned simple hacks fail to fix Windows 10 sound skipping issue, then proceed to solution 2 below. Also Read: Download and Update Microphone Driver for Windows 10
Solution 2: Turn Off Audio Enhancements
A lot of affected users have reported that they managed to fix Realtek audio stuttering issue in Windows 10 after disabling the audio enhancements feature. Here are the steps you need to follow for the same.
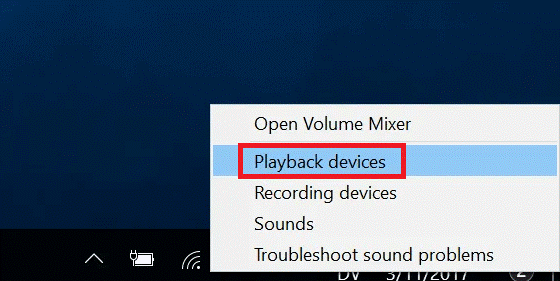
Right-click on the Speakers/ volume icon in the lower-right corner of the screen and select the “Playback devices” option from the context menu.
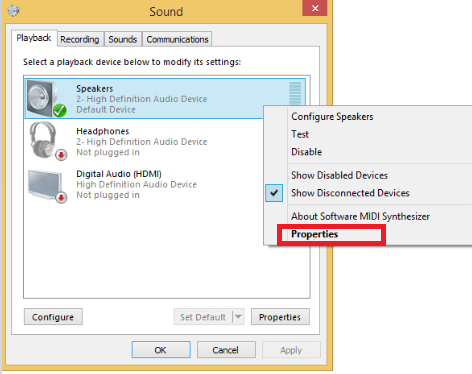
Now, right-click on the default device (the one with a green tick) and select the “Properties” option from the menu.
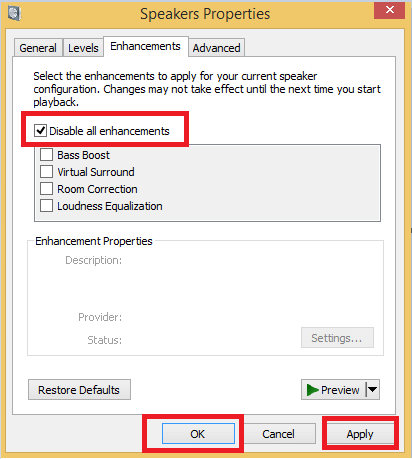
Move to the Enhancements tab, and make sure the checkbox next to “Disable all sound effects” or “Disable all enhancements” is ticked.
Click Apply and OK buttons to save the changes.
After turning off audio enhancements, check to see whether or not the Realtek sound stutters/ distortion problem has been resolved.
Solution 3: Restart Audio Services
Restarting audio-related services is another thing that helped numerous users fix computer audio stuttering issue on Windows 10. Here are the steps that can help you in doing so.
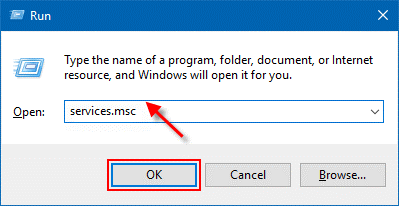
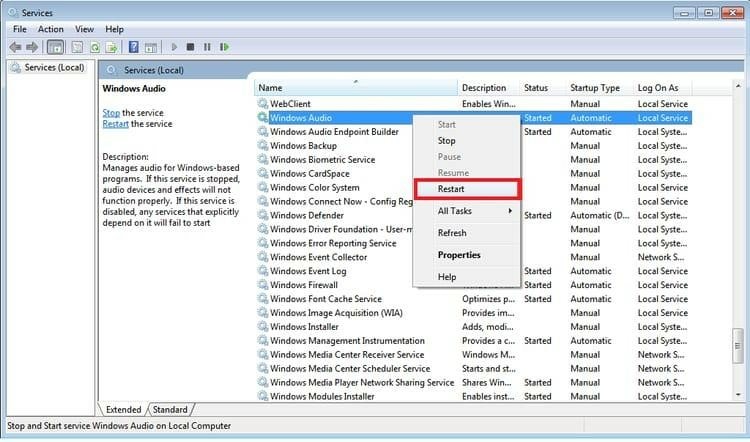
Press the Windows + R key at the same time to invoke the Run command box.In the Run box, type “services.msc” without quotes and click on the OK.
Locate and right-click each of the following services, and then select the Restart option from the context menu.Windows AudioWindows Audio Endpoint BuilderRemote Procedure Call (RPC)
After that, restart your computer.
If restarting these audio services doesn’t help fix Realtek audio stuttering Windows 10 issue, go to the next solution.
Solution 4: Try Reinstalling Realtek Audio Driver
You may hear stuttering or intermittent sound during audio/video playback if your driver installation is corrupted. In this situation, you can try to uninstall and reinstall Realtek audio drivers to fix PC audio stuttering problems. To do so, follow the steps shared below.
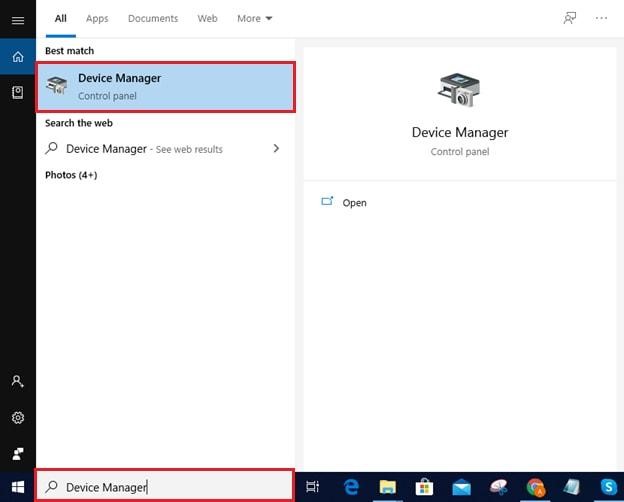
Type Device Manager in the search box on the taskbar, and then select the Best match result.
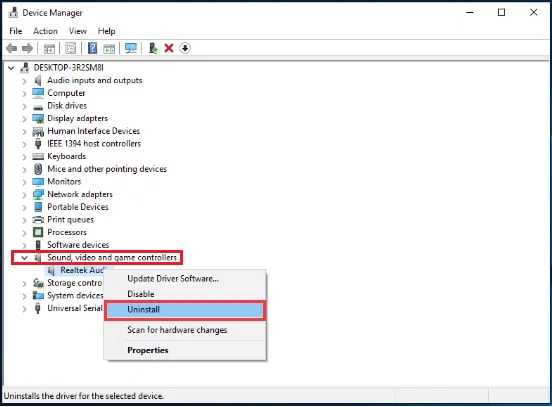
In the Device Manager window, click on the “Sound, video, and game controllers” to expand the devices included in that category.Right-click on your Realtek audio device and select the “Uninstall” option from the pop-up menu.
Once the uninstallation process finishes, reboot your computer.When the computer restarts, Windows operating system will attempt to reinstall the driver for your Realtek high-definition audio device.
Try the next solution below if reinstalling the driver doesn’t fix Realtek audio stuttering issue on Windows 10.
Solution 5: Update Your Realtek Audio Driver (Recommended)
As said earlier, a missing or outdated audio driver is one of the topmost reasons behind the Realtek sound stuttering issue on Windows 10. To resolve it, you can update your PC audio driver to the latest version available. If you don’t want to search for the correct drivers yourself, then you can do it automatically with Bit Driver Updater. With this nifty software at your disposal, all you require to do is to perform a few easy steps that we have mentioned below.
Download, install and launch Bit Driver Updater.
Select the “Scan Drivers” option to detect all outdated and faulty drivers on your PC.After the scan results appear, select your Realtek audio driver and click the “Update Now” button available next to it.
Computer Audio Stuttering Issue: Resolved
We hope one of the aforementioned methods helps you fix Realtek audio stuttering on Windows 10 problem. If you need more help with your Realtek audio skipping or buzzing problem on Windows 10, feel free to leave a comment below and we’ll see what more we can do to help. Lastly, before leaving, subscribe to our newsletter for more such technology solutions.

