File System Error in Windows 10
In general, “File System Error” occurs on a Windows computer due to Hard Disk related issues, caused by corrupted files, bad sectors, disk integrity corruption and other errors. File System Errors can also occur due to presence of malware and occur while trying to access files or programs requiring admin privileges. Irrespective of the reasons, you should be able to fix “File System Error” on your computer using any of the following methods.
1. Switch to Windows Default Theme
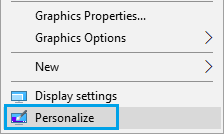
Users have reported fixing “File System Error” by Switching to Windows default theme.
Right-click on the Desktop (in empty space) and select Personalize option in the menu that appears.
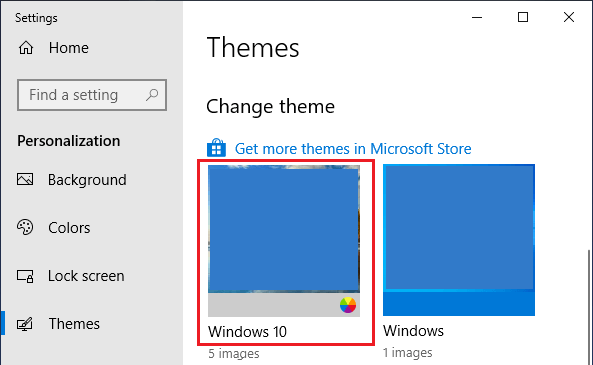
On the next screen, select Themes in the left pane. In the right-pane, select Windows 10, Windows or Windows (light) Theme.
Restart your computer and see if you are still getting “File System Error” notifications on your computer.
2. Reset Windows Store Cache
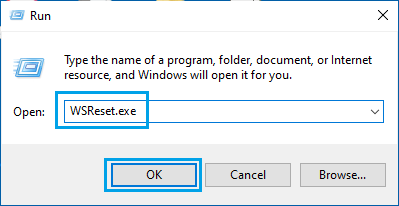
Corrupted or expired Windows Store Cache can also lead to “File System Error” notifications.
Right-click on the Start button and click on Run.
In Run command window, type WSReset.exe and press the Enter key on the keyboard of your computer.
Next, you will see a Blank Command Prompt window. Wait for the blank Command Prompt window to close. Once the blank Command Prompt window closes, you will see Microsoft Store open on your computer and you may see a message reading “The Cache for the Store was cleared”.
3. Use Check Disk Utility Tool
Next, you can trust the built-in Check Disk Utility Tool in Windows 10 to check the Hard Drive on your computer for bad sectors, corrupted files and logical file errors.
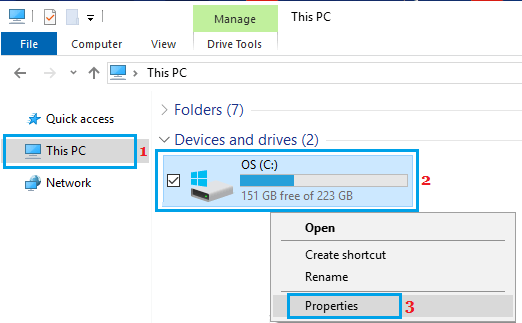
Open the File Explorer on your computer.
On File Explorer screen, click on This PC in the left-pane. In the right-pane, right-click on C:/ Drive and click on Properties.
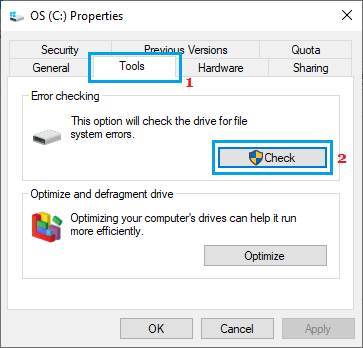
On properties screen, select Tools tab and click on the Check button, located in “Error Checking” section.
Wait for Windows to complete the process of scanning the Hard Disk for errors. Once the scan is complete, Windows will notify you about errors (if any).
4. Repair System Files Using DISM
If Check Disk Utility reports any errors, you can follow the steps below to fix those errors using DISM (Deployment Image Servicing and Management) tool.
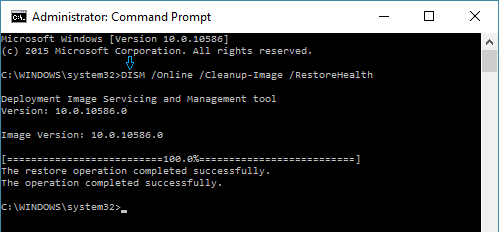
- Right-click on the Start button and click on Command Prompt(admin).
- On Command prompt window, type DISM /Online /Cleanup-Image /RestoreHealth and press the Enter Key.
Note: There needs to be a space after DISM, Online and Cleanup-Image. 3. Wait for the DISM tool to check your computer for errors and fix them. Note: The DISM process can take anywhere from 10 to 15 minutes or more. The progress bar may not show up for a while and you may find the progress stuck at 20 percent for a long time. After the DISM Command is completed, restart the computer and it should now be completely free from File System Errors.
5. Run Virus or Malware Scan
As mentioned above, “File System Errors” can also be generated due to presence of viruses or malware on your computer. Scan your computer for malware using the Antivirus program installed on your computer or you can use Microsoft Defender Offline tool to scan and remove harmful programs from your computer.
How to Check If Hard Drive is SSD or HDD in Windows 10 How to Optimize and Defragment Hard Drive in Windows 10