Automatically Empty Trash Can on Mac
When you delete a file on your Mac, it does not go away from your machine. The deleted file is only moved to the Trash Can on your Mac and it stays there, taking up space and also using resources during startup. The mechanism to keep deleted files in the Trash Can is designed to allow recovery of files, in case a file/files are accidentally deleted by the User. However, letting deleted files to use up space can be a problem, especially for those users who have limited SSD storage on their Mac (128 GB). Hence, Apple has come up with a solution to this issue in its Mac OS Sierra update, allowing Mac Users to Enable the option to Automatically empty the Trash Can after 30 days. This is a reasonable solution, considering the fact that 30 days is good enough time for most users to discover about deleted files on their Mac and recover those files from the Trash Can.
Empty Trash Can Automatically On Mac
Follow the steps below to make the Trash can Automatically empty on your Mac. 1. Right-click anywhere on the Desktop of your Mac to activate the Finder Menu option in the top menu-bar of your Mac. 2. Next, click on the Finder icon and then click on the Preferences… option in the drop-down menu (See image below)
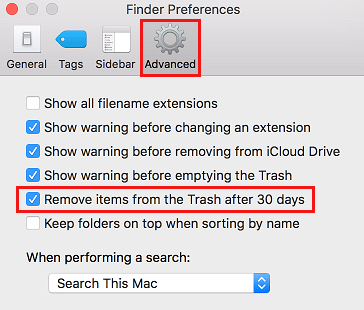
- On the Finder Preferences screen, click on the Advanced Tab and then check the option for Remove items from the Trash after 30 days (See image below)
From now on, whenever you delete a File, Photo or anything else on your Mac, it will be available in the Trash Can for a period of 30 days, after which it is Automatically deleted.