Disable Cortana in Windows 10
Just like Siri on iPhone and Mac, Cortana is a cloud based personal assistant that comes pre-installed on Windows 10 computers. While it was possible to disable Cortana using a single toggle in earlier versions of Windows 10, disabling Cortana after the Windows 10 Anniversary update is difficult. Cortana is now said to be more integrated with Windows 10 operating system and disabling Cortana has reportedly caused problems with Windows Search feature. However, if it has become necessary, you can still disable Cortana in Windows 10, using two different methods as provided below.
1. Disable Cortana Using Settings
This method disables collection of information by Cortana and does not completely disable Cortana on your computer.
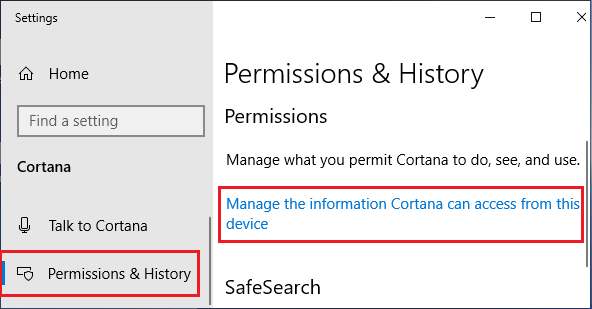
Go to Settings > Cortana > Permissions & History and click on “Manage the Information Cortana can access from this device”.
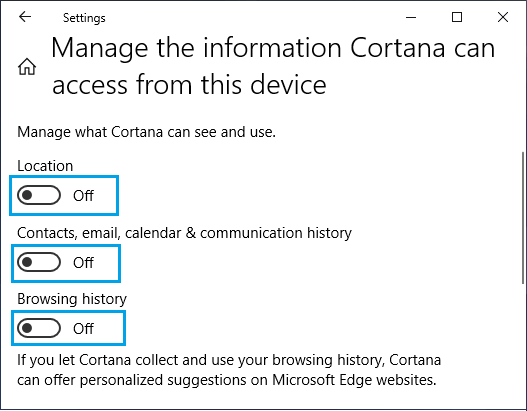
On the next screen, toggle OFF Location, Contacts, email, calendar & Communications history and browsing history.
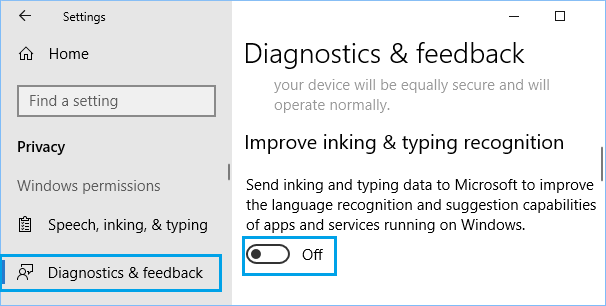
3. Next, go to Settings > Privacy > Diagnostic & feedback > Toggle OFF Improve inking & typing option
4. Go to Settings > Privacy > Speech > Turn Off Online Speech Recognition. 5. Go to Settings > Privacy > Inking & typing Personalization > Turn Off Getting to Know You section.
2. Disable Cortana Using Registry Hack
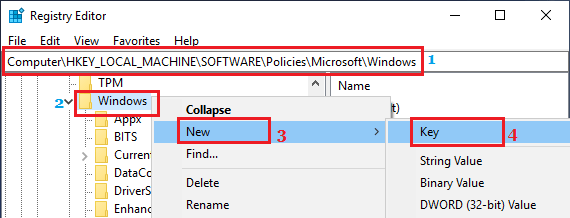
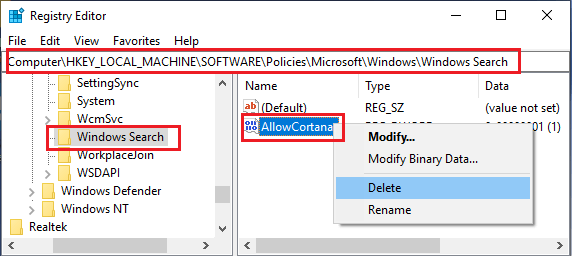
Currently, the only way to completely disable Cortana in Windows 10 is by editing registry values in “Windows Search” folder located at HKEY_LOCAL_MACHINE\SOFTWARE\Policies\Microsoft\Windows. Before making registry edits it is recommended that you create a system restore point. This will allow you to go back to the Restore Point, in case of problems.
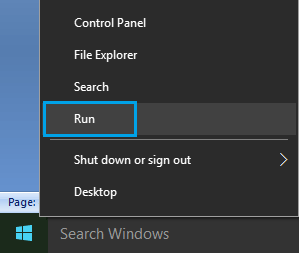
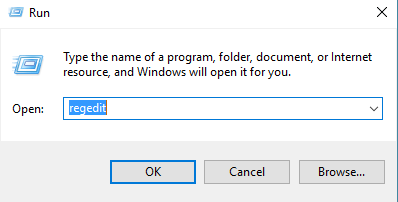
Right-click on the Start button and click on Run.
In the Run Command Window, type regedit and click on OK.
On the registry editor screen, navigate to HKEY_LOCAL_MACHINE\SOFTWARE\Policies\Microsoft\Windows and see if you can find “Windows Search” folder. If you cannot, right-click on Windows Folder > click on New > Key and Name the new key as “Windows Search”.
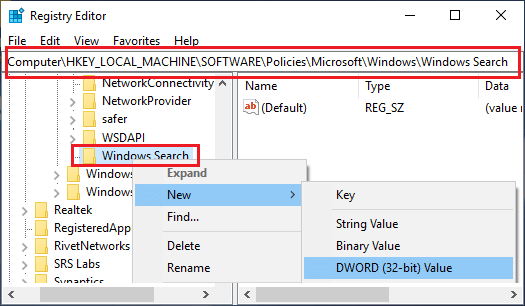
4. Next, right-click on the newly created Windows Search Folder > click on New > DWORD (32-bit Value).
5. Name the New DWORD as “AllowCortana“.
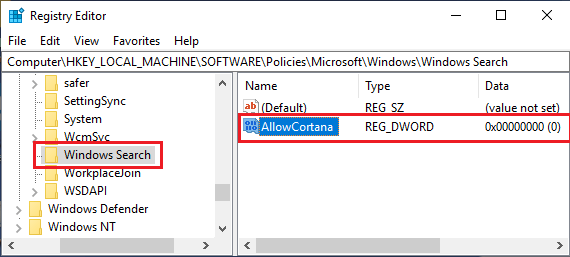
6. Restart your computer for the changes to be implemented. Once your computer restarts, Cortana will be completely disabled on your computer, until the next major Windows update. According to some users, completely Disabling Cortana using Registry Editor has brought bugs on their computer. If you experience problems, you can enable Cortana back on your computer either by deleting AllowCortana or by double-clicking on AllowCortana and changing its Value Data from 0 to 1.
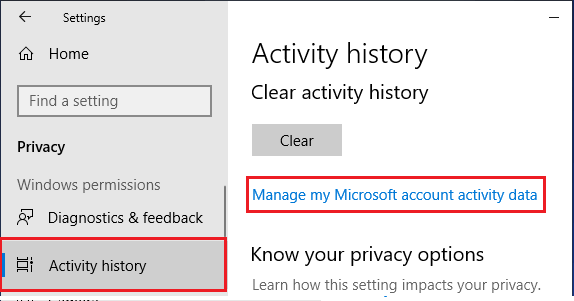
Clear Your Data from Microsoft Servers
Just turning off Cortana will not delete your data from Cortana’s memory and Microsoft Servers. In case you happen to switch Cortana back on, Cortana will still remember your browsing habits, preferences and generally everything that it had learned about you, before being disabled. Hence, follow the steps below to clear your information from Microsoft’s cloud servers.
Go to Settings > Privacy > Activity History and click on Manage My Microsoft Activity Data.
On the next screen, you will be able to sign-in to the Microsoft Account linked your computer and clear your browsing, location, search and other data from Microsoft servers.
How to Stop Windows 10 From Sending Activity History to Microsoft How to Disable Keylogger in Windows 10