Change Privacy Settings on iPhone
In general, all Apps on iPhone are required to seek user consent or permission before accessing Contacts, Photos, Camera, Microphone, Location and other sensitive information. However, the problem is that many users still end up unknowingly providing unwanted Apps with access to their sensitive personal information. Luckily, it is easy to change Privacy Settings on iPhone and ensure that Apps are provided with access to your information, only when it is necessary.
1. Select Which Apps Can Access Your Location
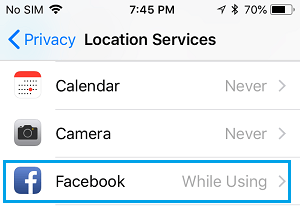
While Apps like Maps, Weather and Find My iPhone have a valid reason to access your location information, you may not want Facebook, WhatsApp or certain other Apps to access your Location. Go to Settings > Privacy > Location Services select the App that you do not want to access your Location Data.
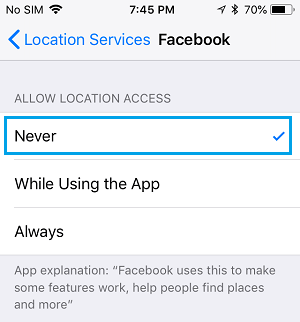
On the next screen, select the Never option to prevent this particular App from accessing your location.
You can repeat the above steps to prevent other Apps from accessing your Location.
2. Select Which Apps Can Access Your Contacts
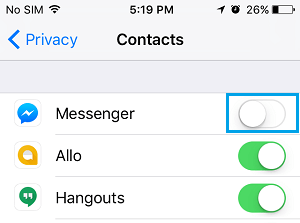
Most Social Media Apps try to get user permission to access Contacts while they are being installed and later on while they are being used. Hence, it makes sense to periodically take a look at Apps having access to your Contacts and prevent unwanted Apps from accessing your Contacts. Go to Settings > Privacy > Contacts > move the toggle next to Unwanted Apps to OFF position.
With these steps, you have disabled Facebook Messenger from accessing your Contacts on iPhone.
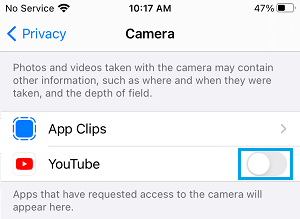
3. Check Which Apps Can See You
While you may want Apps like FaceTime, Skype or Google Meet to access the Camera on your iPhone, you need to make sure that other unwanted Apps do not have access to the Camera on your iPhone. Go to Settings > Privacy > Camera > move the toggle next to unwanted Apps to OFF position.
This way you can ensure that only the required Apps have access to the Camera on your iPhone.
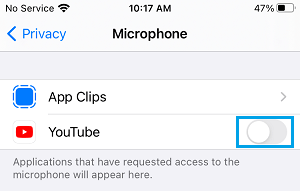
4. Check Which Apps Can Listen to You
Similarly, you need to rule out the possibility of unwanted Apps being able to listen to you. Go to Settings > Privacy > Microphone > disable unwanted Apps by moving the toggle to OFF position.
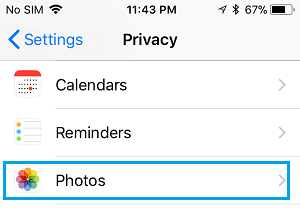
5. Check Which Apps Have Access to Your Photos
You can check which Apps have access to Photos by going to Settings > Privacy > Photos.
On the next screen, you will see the list of Apps requesting access to Photos on your iPhone.
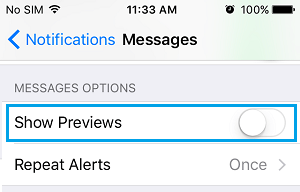
6. Disable Lock Screen Message Previews
If Message Previews are appearing on the screen of your unlocked iPhone, you need to be aware that this information can also be seen by others around you. You can prevent Lock Screen Message Previews by going to Settings > Notifications > Messages and moving the toggle next to Show Previews to OFF position.
7. Disable Lock Screen Notifications
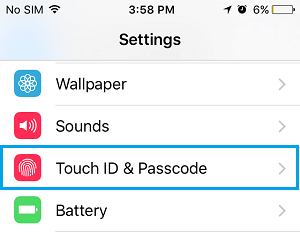
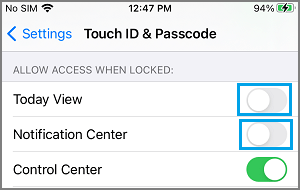
If more Privacy is required, you can prevent Message, Call and other Notifications from being seen by anyone around you. Go to Settings > Touch ID & Passcode > when prompted, enter the Lock Screen Passcode for your device.
On the next screen, scroll down to Allow Access When Locked section and move the toggle next to Notifications Center and Today View to OFF position.
After this, no one will be able to view Notifications on your iPhone without its Lock Screen Passcode.
8. Protect Voicemail Messages
Make sure that you setup a strong Password for the Voicemail on your iPhone by going to Settings > Phone > Change Voicemail Password. On the next screen, enter a strong Password to make it difficult for anyone to gain access to your Voicemail by guessing or using Brute-Force attacks.
9. Turn OFF Live Photos
According to Apple, Live Photos record what happens 1.5 seconds before and 1.5 seconds after you take the picture. This exposes you to the risk of your personal or private information being recorded in those 3 seconds. Open the Camera on your iPhone > select Live Photo Icon and tap on the OFF option.
Once Live Photos are disabled on your iPhone, you will see the Live Photos Icon appearing with a strike mark.
10. Prevent Websites from Tracking Your Location
The Safari browser on iPhone provides the option to prevent websites from tracking your location while browsing. Go to Settings > Safari > Location and selecting the Deny or Ask option.
If you select the “Ask” option, Safari browser will be prompting you for permission, whenever any website wants to track your Location.
How to Speed Up Slow iPhone and iPad How to Improve iPhone Battery Life


![]()
