Add or Subtract Dates in Microsoft Excel
Microsoft Excel stores Dates in the form of sequential serial numbers, which allows you to Add/Subtract Dates and use Dates in Formulas and calculations. The baseline for serialization of dates in Microsoft Excel starts from “01 Jan 1900” which is assigned a serial number of 1 in Microsoft Excel program. Dates occurring after the baseline date (01 Jan 1900) are assigned sequential serial numbers based on the number of days from the initial date. For example, the Serial Number for “31 March 2018” is 43190 because this date is occurring 43190 days from the baseline date of January 1, 1900. Similarly, time information is saved in the form of decimals in Excel – 0.5 indicates midday, 0.25 is 6AM and 0.75 is 6PM in Excel.
How to Enter Dates in Excel
Before going to examples of Adding and Subtracting Dates in Excel, you may want to know the right method to enter dates in Excel. To enter Dates in Excel, you can type 1-jan-2018, 1/1/2018 or January 1, 2018. When you type in this format in an Excel cell, the program can easily recognize that you are trying to enter a Date and automatically applies the Date Format to the cell. Whenever Excel detects that you have entered a Date, it automatically aligns the entry to the right, as opposed to left-aligned text values. If Excel fails to recognize your entry as a Date and you see the entry being left-justified (like regular text), you can try to enter the Date once again in any of the Date formats as mentioned above and it should correct the entry.
Subtract Dates in Microsoft Excel
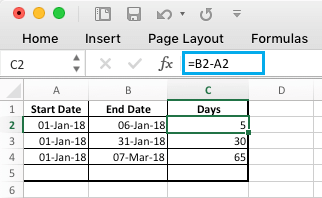
To illustrate the Subtraction of Dates in Excel, let us assume that you have the “Start Dates” in Column A and the “End Dates” in Column B. Now to calculate the Number of days between the two Dates, type =B2-A2 in column C and hit the enter key on the keyboard of your computer.
Once you have entered the formula in first column, you can drag the formula down to all the remaining cells.
Add Days to Dates in Microsoft Excel
In this case, let us assume that you have the “Start Dates” in column A and the “Number of Days” to complete the task in Column B.
Now, you can calculate the End Dates by using typing =A3+B3 in Column C and pressing the Enter Key on the keyboard of your computer.
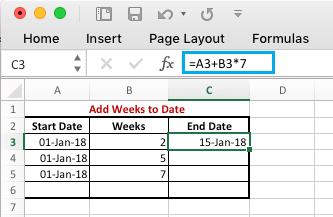
Add Weeks to Date in Excel
Let us assume that you have the “Start Dates” in column A and “Number of weeks” to complete the tasks in Column B. To arrive at end dates, you can type =A3+B3*7 and hit the enter key on the key.
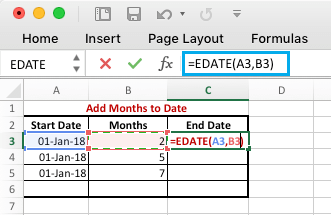
Add Months to Date in Excel
The EDATE Function in Microsoft Excel allows you to Add Months to given Dates. The Syntax of EDATE function is EDATE (Start-date, Number of months).
As you can see in above image, the EDATE function allows you to reference Cells containing the Start Date and the Number of Months required to complete the tasks.
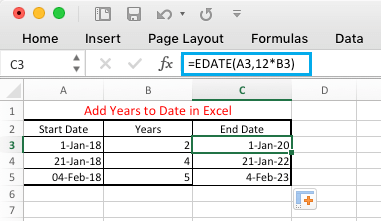
Add Years to Date in Excel
In this case, let us assume that you have the “Start Dates” in Column A and the “Number of years” to complete the task in Column B. To calculate the End Dates, type =EDATE(A3,12*B3) and hit the enter key on the keyboard of your computer.
Useful Date and Time Functions in Microsoft Excel
Following are some of the most commonly used Date and Time Functions that are used in Reports.
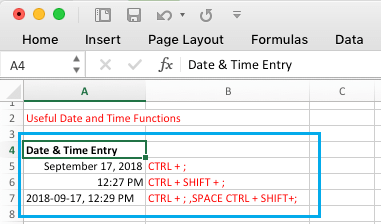
TODAY() : Returns Todays Date, that will automatically update Ctrl +; Inserts Todays Date as a static value, which will not update the next day Ctrl+Shift+; Inserts the current time
To enter the current date and time, press Ctrl+; press the Space key and then press Ctrl+Shift+;
How to Add Prefix or Suffix in Excel How to Create Pivot Table From Multiple Worksheets