High CPU Usage in Windows 11
A common reason for high CPU Usage in Windows 11 is due to various Apps like Skype, OneDrive and others starting up with the computer and running in background, unnecessarily using up resources on the computer. Apart from this High CPU Usage can also be caused due to expired/corrupted device drivers, Malware, Viruses, Rogue Programs, Incorrect or corrupted Registry settings and other reasons. In most cases, you should be able to significantly reduce CPU Usage on your computer using methods as provided below.
1. Disable Startup Programs
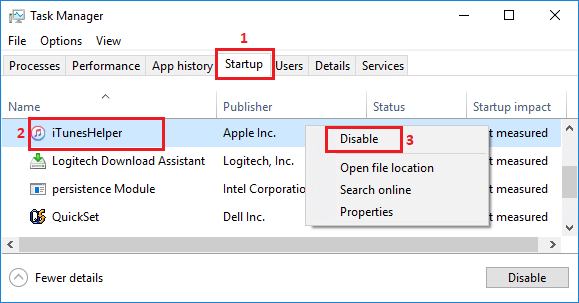
If your computer is struggling to run and has become painfully slow, start by closing unwanted startup programs in the Task Manager. Right-click on the Start button and click on Task Manager. On Task Manager screen, switch to Startup tab and you will see the list of programs that open with the computer.
Right-click on the Program that you do not want to open at startup and click on Disable option in the contextual menu. Repeat the above steps to stop other unnecessary Apps from starting with your computer.
2. Update Device Drivers
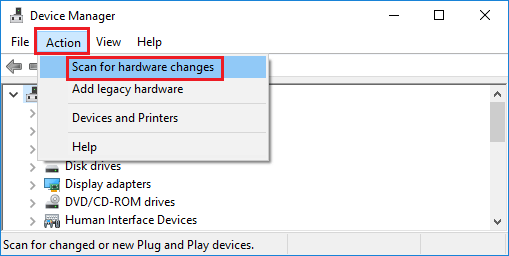
Right-click on the Start button and select Device Manager. On Device Manager Screen, click on Action > Scan for hardware changes.
Windows will scan your computer for Hardware changes and update device drivers (if required).
3. Limit Background Running Apps
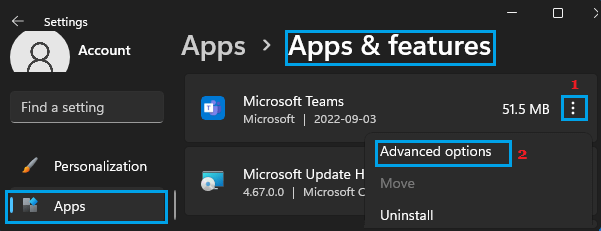
The default tendency in Apps like Spotify, OneDrive, Microsoft Teams, Skype and others is to Startup with the computer and keep running in the background. Hence, preventing or limiting background running Apps is one of the most effective stratagies to reduce CPU usage on a Windows PC. Click on Start button > Settings > Select Apps in the left-pane. In the right-pane, click on Apps & Features card.
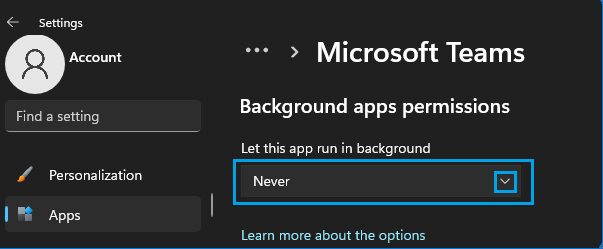
On Apps & Features screen, click on 3-dots icon next to Microsoft Teams and select Advanced options.
On the next screen, use the drop-down to select the Never option for Let this App Run in the Background settings.
Similarly, you can prevent Skype, OneDrive, Spotify and other Apps from starting up with the computer and running in background.
4. Disable Runtime Broker
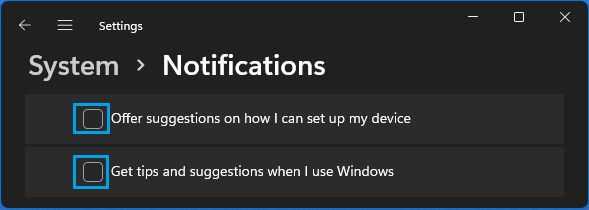
Users have reported the problem of High CPU Usage by Runtime Broker in both Windows 10 and Windows 11 computers. Go to Settings > System > click on Notifications in the right-pane > scroll down in the right-pane and uncheck Offer suggestions on how I can setup my device and Get tips and suggestions when I use Windows options.
Restart your computer and you should now see it running better than before. Users have reported significant reduction in Runtime Broker activity after making this single change on their computer.
5. Disable Updates from More Than One Place
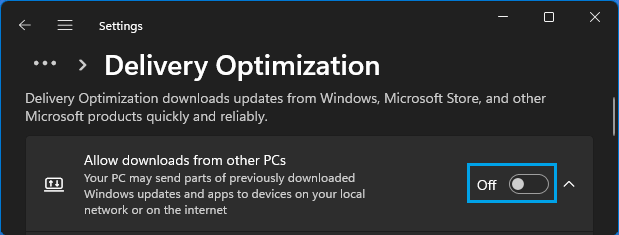
Go to Settings > Windows Update (left-pane) > Advanced Options (right-pane) > scroll down and click on Delivery Optimization. On the next screen, disable Allow Downloads from other PCs option.
Disabling this update option is known to reduce Runtime Broker Activity and this should reduce High RAM and CPU usage on your computer.
6. Scan for Malware and Uninstall Unwanted Programs
A common reason for high CPU usage is due to the computer being infected by viruse/malware. You can rule out this possibility by Scanning the computer for malware. You can either use Microsoft Defender Offline Scan or use the scan function of Norton or other Third-party antivirus program installed on your computer. If the Scan detects a virus, it will automatically clear the virus/malware from the computer or prompt you for futher actions.
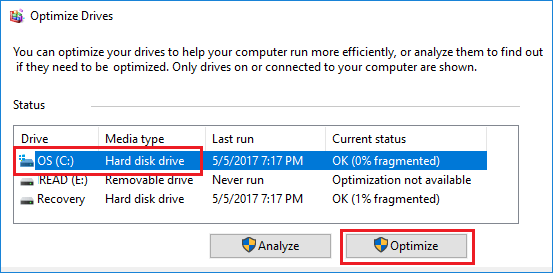
7. Defragment Hard Drives
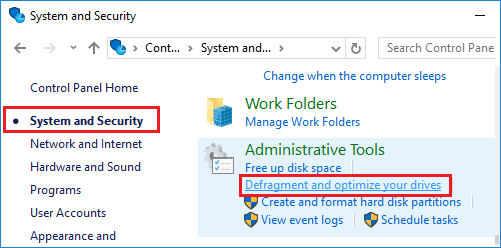
Defragmenting the Hard Drive can help in improving the performance of computers using HDD Drives. Open Control Panel > click on System and Security in the left-pane. In the right-pane, scroll down to “Administrative Tools” section and click on Defragment and optimize your drives.
On the next screen, select the Drive that you want to defragment and click on Optimize button.
Patiently wait for Windows 10 to complete the process of optimizing the selected drive.
8. Setup Visual Effects for Best Performance
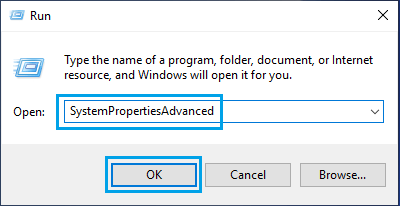
Right-click on the Start button and click on Run. In the Run Command window, type SystemPropertiesAdvanced and click on OK.
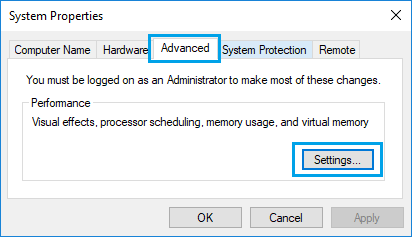
On the next screen, switch to Advanced tab and click on the Settings button under “Performance” section.
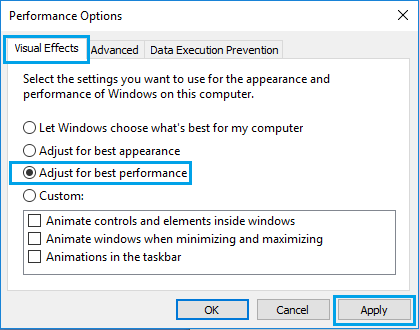
On the next screen, switch to Visual Effects tab and select Adjust for best performance option.
Click on Apply > OK to save these settings on your computer.
9. Allow System to Manage Virtual Memory
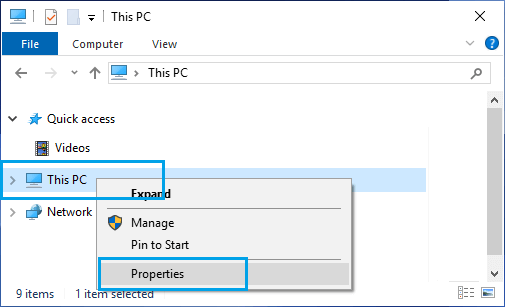
Allowing the computer to set System Managed Size for files allows it to use Virtual memory (paging file), whenever there is a shortage of RAM on the computer. Open File Explorer > right-click on This PC and click on Properties.
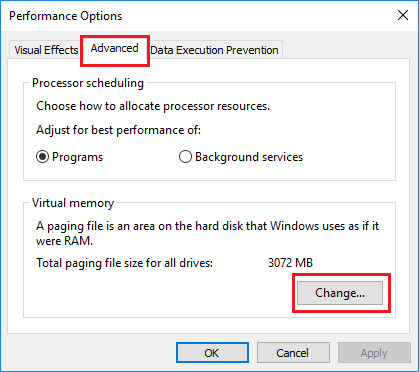
On the System screen, click on Advanced system settings link located under “Related Settings” section. On the next screen, switch to the Advanced tab and click on Settings button under Performance section.
On the next screen, switch to Advanced tab and click on the Change button located under Virtual Memory section.
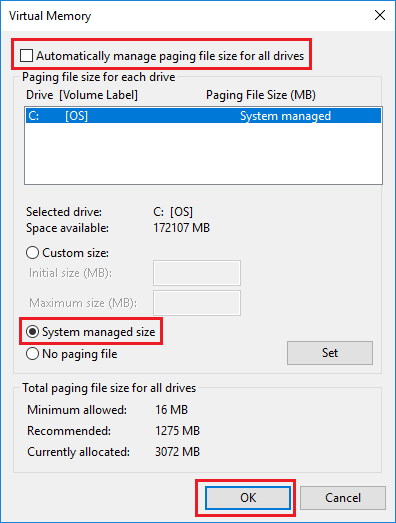
On Virtual Memory screen, uncheck Automatically manage option, select your Hard Drive and select System Managed size and click on OK.
Make sure that you Restart the computer for above changes to be implemented.
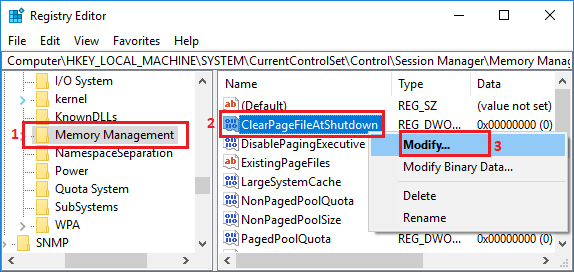
10. Modify Memory Management System
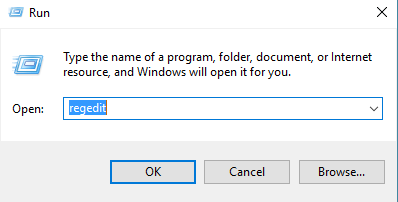
Right-click on the Start button and click on Run. In the Run Command window, type Regedit and click on OK.
On Registry Editor screen, navigate to “HKEY_LOCAL_MACHINE\SYSTEM\CurrentControlSet\Control\Session Manager” and click on Memory Management (1) Folder.
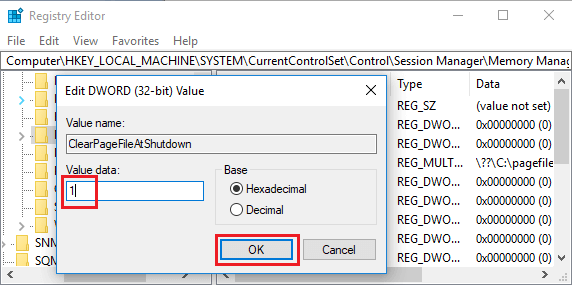
In the right-pane, right-click on ClearPageFileAtShutDown (2) and click on Modify (3) (See above image). On the Edit DWORD Value screen that appears, change the value of ClearPageFileAtShutDown from 0 to 1 and click on OK.
Restart your computer, in order to apply this change on your device.
11. Remove Unwanted Programs
Finally, consider Removing Unnecessary Apps and Programs installed on your computer. This helps in recovering the storage space and reducing unwanted resource usage on your computer.
Fix: High Memory Usage By Microsoft Edge in Windows 10/11 How to Project Laptop to TV: Windows 11/10