High CPU Usage By OneDrive in Windows 10/11
As you must have noticed, OneDrive has a default tendency to startup with the computer and continue running in the background. This can sometimes lead to High CPU Usage, especially on Budget Windows 10/11 computers that are equipped with a limited amount of RAM and processing power. You can find below a number of methods to fix the problem of High CPU Usage by OneDrive and it is recommended that you follow these methods in the same order as provided below.
1. Uninstall OneDrive
You can go for this option, if you are using Google Drive or another Cloud Storage Service and also if you are unlikely to use OneDrive. If you change your mind, you can always install OneDrive back on your computer from Microsoft Store and start using Microsoft’s Cloud Storage service. For more information about this, you can refer to: How to Disable or Uninstall OneDrive in Windows 10
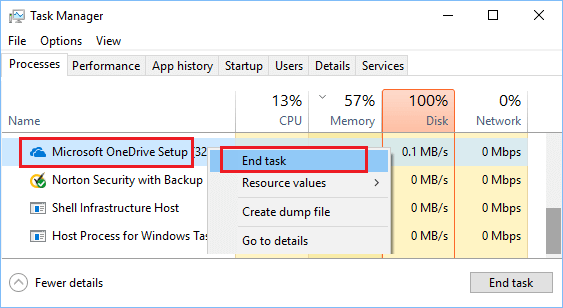
2. Restart OneDrive
Just like restarting the computer, restarting any app, program or service has the potential to clear stuck programs, which might be causing the problem on your computer. Right click on the Start Button and click on Task Manager > On the Task Manager screen, right-click on Microsoft OneDrive Setup and click on End Task.
After this, Restart OneDrive and see if it is still causing High CPU Usage problem on your computer.
3. Reset OneDrive
If OneDrive is constantly consuming 10 to 20% CPU on your computer, the problem can often by fixed by Resetting OneDrive service. Right-click on the Start button and click on Run. In the Run Command window, type %localappdata%\Microsoft\OneDrive\onedrive.exe /reset and click on OK.
Once you click on OK, you will see the OneDrive Icon in the system tray disappearing and then re-appearing after a while (Can take 60 seconds or more). If the OneDrive Icon does not appear in the System Tray, type %localappdata%\Microsoft\OneDrive\onedrive.exe in the Run Command windows and click on OK.
After this, monitor CPU Usage by OneDrive on your computer by going to the Task Manager.
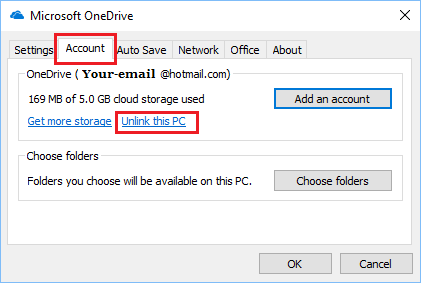
4. Unlink OneDrive
Yet Another solution for High CPU Usage by OneDrive is to unlink your current OneDrive Account from OneDrive app and link it back again. Click on System Tray Icon > right-click on OneDrive Icon and select Settings option in the menu that appears.
On OneDrive Settings screen, switch to Account tab and click on Unlink this PC link.
On the confirmation pop-up, click on Unlink Account button to confirm.
Restart the computer > Login to OneDrive and monitor CPU Usage by OneDrive.
5. Delete OneDrive Setup Files
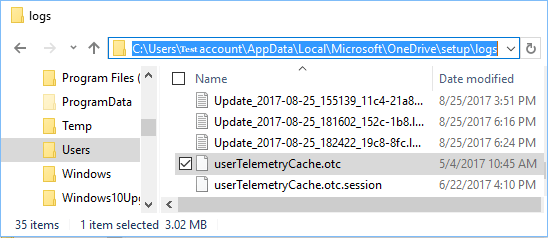
The problem of High CPU Usage by OneDrive is also reported to be due to OneDrive constantly trying to complete File Operations that are failing due to non-English characters in Account Usernames or in File Profile Paths. This problem can be fixed by deleting specific hidden files on your computer and for this you need to enable the option to View Hidden Files on your computer. Open File Explorer > click on the View Tab and check the option for Hidden items.
Next, navigate to C:\Users\Admin\AppData\Local\Microsoft\OneDrive\setup\logs > Scroll down to bottom and delete userTelemetryCache.otc and userTelemetryCache.otc.session files.
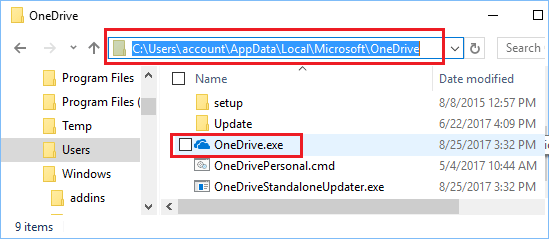
After deleting the files go to C:\Users\Admin\AppData\Local\Microsoft\OneDrive and double-click on OneDrive.exe file.
After this, you should find CPU usage by OneDrive being drastically reduced on your computer.
6. Set Diagnostic and Usage Data to Basic
If above solutions did not help, Disable Telemetry services on your computer and see if this helps in fixing High CPU Usage by OneDrive. Go to Settings > Privacy > select Feedback & diagnostics tab in the left-pane. In the right-pane, set “Diagnostics and usage data to Basic.
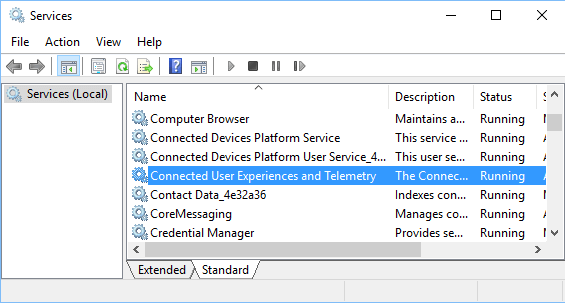
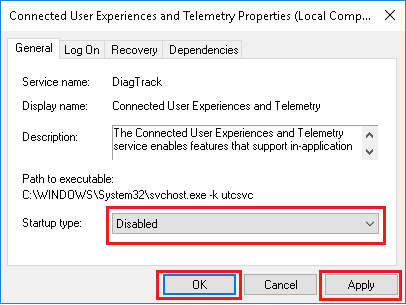
7. Disable Connected User Experience
Open Run Command (Press Windows + R keys) > type services.msc in the Run Command window and click on the OK button
On the services screen, scroll down and double-click on Connected User Experiences and Telemetry.
On the next screen, disable Connected User Experience and Telemetry by setting Startup Type to Disabled.
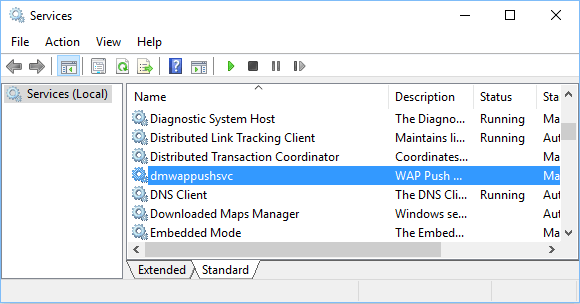
On the same screen, locate dmwappushsvc service and disable it
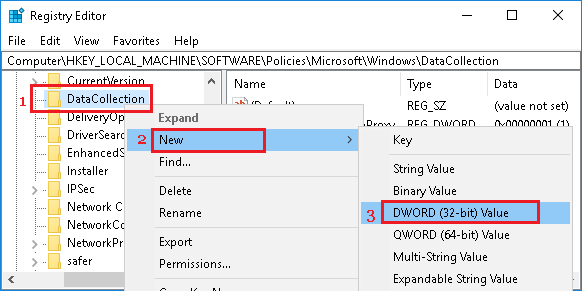
8. Disable Telemetry Using Registry Editor
If the problem is not yet fixed, you can consider Disabling Telemetry altogether on your computer by using Registry Editor. Open Run Command (Windows Logo + R) > type regedit in the Run Command window and click on OK.
On the Registry Editor screen, navigate to HKEY_LOCAL_MACHINE\SOFTWARE\Policies\Microsoft\Windows\DataCollection. Under Data Collection, create a New DWORD called AllowTelemetry and set its Data Value to “0”.
Disabling Telemetry has not impacted the performance of our testing computer in any way. However, you should also consider other opinions, before disabling any Windows Service.
How To Fix High RAM and CPU Usage in Windows 10 How to Fix Runtime Broker High CPU Usage in Windows 10


![]()