Camera Not Working in Windows 10
When you connect an external camera to your computer, Windows 10 operating system can automatically detect and configure the camera to work properly work on your computer. However, both External or the built-in Laptop Camera on your computer can suddenly stop working due to outdated or corrupted driver software, privacy settings or hardware related problems.
1. Check Camera Connection
If you are using an external Camera, make sure that the Camera is properly connected to your computer. If connections look alright, remove the Camera from its current USB Port and plug it to another USB port. Certain Cameras are equipped with a physical button to switch the camera ON and OFF, make sure the switch is in the ON position.
2. Allow Apps to Access Camera
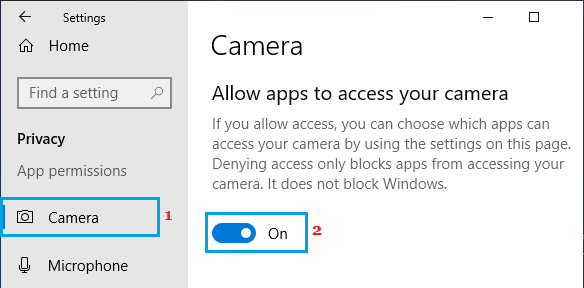
Make sure that Apps have the permission to Access Camera on your computer.
Go to Settings > Privacy > Camera > move the toggle under “Allow Apps to access Camera” to ON position.
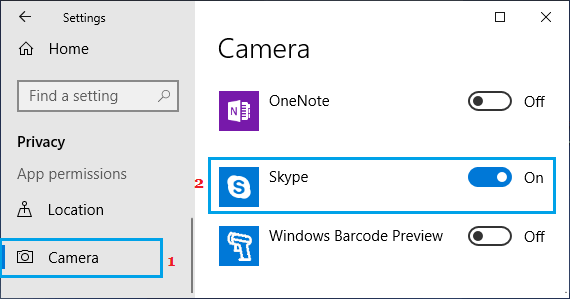
Next, scroll down on the same screen and enable the required Apps (Skype, Zoom, etc,) to access Camera.
On the same screen, scroll down further and Allow Desktop Apps to access your Camera.
3. Enable Camera Using Device Manager
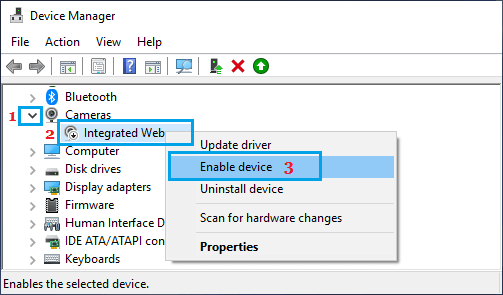
Right-click on the Start button and select Device Manager.
On Device Manager screen, expand the entry for Cameras > right-click on the Camera and click on Enable Device option.
Restart your computer and see if the Camera is now working on your computer.
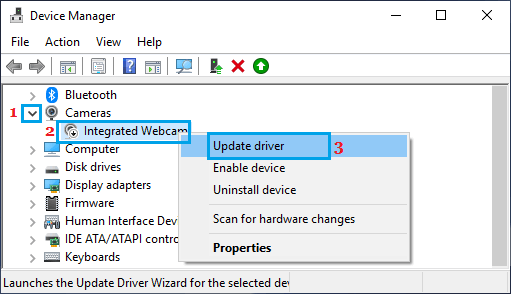
4. Update Camera Drivers
Follow the steps below to Update the Driver software for the Camera.
Right-click on the Start button and click on Device Manager.
On the Device Manager screen, expand the entry for Cameras (or Imaging Devices), right-click on your Camera and click on Update Driver.
On the next screen, click on Search Automatically for updated driver software option and follow the onscreen prompts to install updated drivers (If available).
Restart your Computer and see if you are now able to use the Camera on your computer.
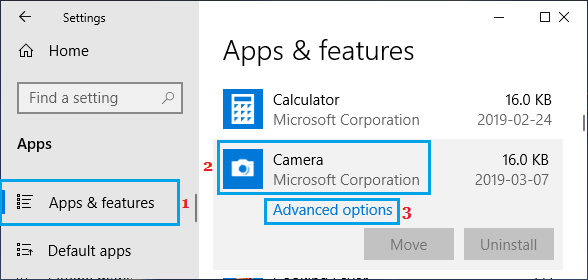
5. Reset the Camera App
It is possible that the error message is being caused by a software glitch or a bug in the Camera App.
Go to Settings > Apps > select Apps & Features in the left pane. In the right-pane, scroll down and click on Camera > Advanced options.
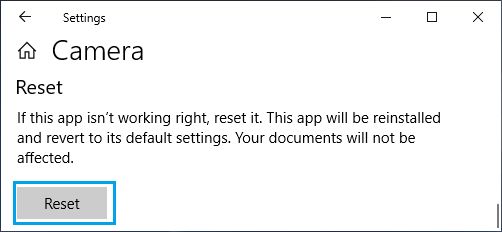
On the next screen, scroll down and click on the Reset button.
On the pop-up, click on Reset again to confirm. Restart your computer to implement this change.
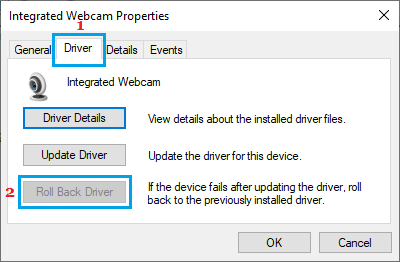
6. Roll Back Camera Driver
If the problem has started after installing updates, try to Roll Back the Camera Driver and see if this helps in fixing the issue.
- Right-click on the Start button and click on Device Manager.
- On the Device Manager screen, expand the entry for Cameras (or Imaging Devices), right-click on your Camera and click on Properties.
- On Properties screen, select the Driver tab and click on Roll Back Driver option.
If Roll Back Driver option is not available, it means that your computer does not have any previous driver that it can Roll Back to.
7. Install Updates
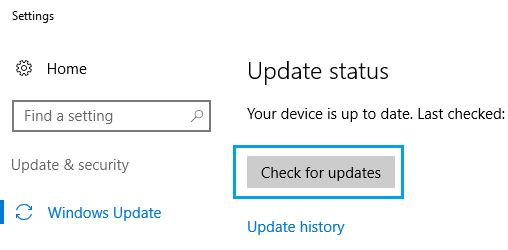
Go to Settings > Update & Security > Windows Update > and click on Check For Updates.
Install Updates (if available).
8. Create New User Profile
If above solutions did not help, create a New Admin User Account and see if the Camera is working. If the Camera is working under New User Profile, it is most likely that the problem is due to your User Profile being corrupted.
How to Fix Skype Video Not Working in Windows 10 Fix: Webcam is Being Used By Another Application Error in Windows 10